Monday, December 12, 2011

In the Kitchen: Grandma Scott's Potato Soup

Eating potato soup at Grandma's is something I will remember fondly from my childhood because I love potatoes and love my Grandma! When I was old enough to learn how to cook, Grandma Scott showed me how to make some great dishes. Unfortunately she does not always follow a recipe (a sign of a good cook!). So this is  my first and meager attempt at writing a recipe!

Ingredients:

3/4 cup butter or margarine (divided)
1 cup chopped carrots
2 stalks of celery chopped (approximately 3/4 cup)
1 medium onion chopped
1 clove of garlic minced
4 tablespoons of cornstarch
9 cups of milk (divided)
1 tsp salt
1 1/2 tsp pepper
2 bay leaves
5-6 medium potatoes
2 cups of shredded cheddar cheese


Add 1/4 cup of butter, onion, carrots, celery, and garlic to a large stock pot over low to medium heat. Saute until the onions and celery start to become translucent, about 5-7 minutes.

In the mean time, chop the potatoes (Make sure to clean them first. You may also peel the potatoes, I prefer to leave the skins on). I cut mine into 1 inch cubes, you could also cut them into smaller cubes, or shred the potatoes, depending on your preference.

Combine 1 cup of milk and 4 tablespoons of cornstarch until smooth. Add the salt and pepper, remaining butter, and milk/cornstarch mixture. Bring soup to a boil slowly, stirring frequently to prevent the soup from burning. About 5 minutes until the soup begins to boil and thicken.


Add the remaining milk and potatoes to the soup and return to a boil, stirring frequently, about 10 minutes. When soup is at a low boil add the 2 cups of shredded cheese and bay leaves. Reduce the heat to a low and cover the soup. Simmer the soup for about 30 minutes, stirring occasionally, until the desired thickness of soup* is reached and the potatoes are cooked thoroughly.

Serve soup with additional shredded cheese and bacon on top. Enjoy!

*If soup is not thick enough, combine more milk and cornstarch and add to the soup, until the desired thickness is reached. 

Wednesday, December 7, 2011

DIY: Snowflake Crayons

The snow in Livermore does not fall as abundently as it does in Illinois. If snow comes it usually sticks to the tops of the hills (1,000-2,000 feet up). To make up for my desire for snow at Christmas time, I decided to make snowflakes! I used old, broken crayons that were headed for the garbage, and turned them into some lovely Christmas gifts for the little ones in our family!

Here are the simple steps:

1. Collect old crayons and remove the paper. Greg and I used exacto knives to slice the paper and peel it off. It was difficult to peel the paper off of the really old crayons, so we just tossed those in the garbage. I would recommend using and old cutting board or mat as your work surface.


2. Sort the crayons into muffin tins or small containers by color.


3. Use an exacto knife and old cutting board to break the crayons in 1/2 inch pieces. The smaller and more uniform the crayon bits are, the better they will melt in the oven. Pre-heat the oven to 200 degrees during this step.

Add the crayon bits to a silicone baking mold. I found mine in the dollar section at Target. You could also use a regular or mini muffin tin to make circular crayons.

You can add bits of crayon that are all the same color to create a solid color crayon, or vary the colors to create a swirl crayon. I liked the way the light green and dark green crayon pieces mixed to created a swirl crayon.


4. Place the mold on a baking sheet and bake in the oven for 20-25 minutes (200 degrees). The crayon bits should be completly melted when finished. Let cool on a cooling rack for several hours, or let the tray cool for 10 minutes and then place in the freezer for 30 minutes. When you peel the mold back you will get these beautiful crayons!


I had inspiration to make these from this blog post here. I have also read about similar ideas online that suggested using only Crayola crayons, due to the high quality of wax.


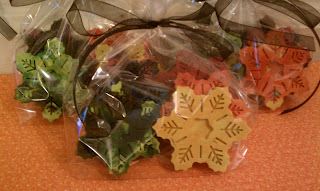
I know some little ones that will love these snowflake crayons! Here is what I did to package the crayons as gifts.
I used composition books to create personalized coloring books to wrap with the crayons!